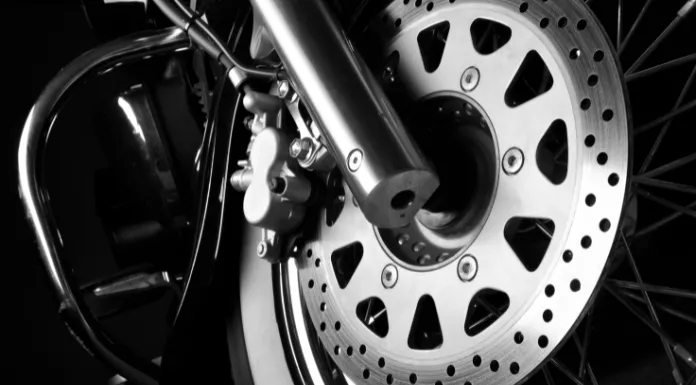
Although you cannot stop incidents, you can halt them with your cleverness and techniques. If you keep the brake discs on your motorcycle in good shape, they might last longer.
The first thing you need to know to plan your maintenance routine is how long your brake discs should last, because knowing this helps prevent unforeseen garage trips.
Knowing the appropriate age for your break is crucial, though.
I’ve covered all the responses that might peak your interest. To get answers to all of your questions, read the article through to the very end.
How Long Should A Motorcycle Brake Disc Last?
Brake discs should typically last for more than 50,000 miles, although a variety of circumstances can shorten or lengthen their life.
However, you can get up to 80,000 miles from one pair if you take good care of them and drive safely.
In this instance, the brake discs will need to be constantly monitored, as they can last up to 30,000 miles before wearing out. You must also pay attention to your brake pads.
The friction needed to slow the car is produced by the brake pads; as a result, the wheels and brake discs revolve and apply pressure to the brake pads. It depletes them.
A typical pair of brake pads should last 50,000 miles, but discs’ longevity can also be impacted by other variables. However, you can live longer if you routinely check the condition of your brake discs and pads.
Which Factors Affect The Life of The Brake Disc?
Several variables can significantly shorten the lifespan of your brake discs, let me tell you that.
To give you a general sense of how long your brake discs should last, we’ve listed some of the most prevalent variables below, along with strategies for reducing their influence.
1. Aggressive braking
The first reason is aggressive braking. You’ll need to consider pressing the pedal more slowly and stopping more slowly to improve the lifespan of your brakes.
Because often, if you leave it until the very last moment to start braking, slamming the pedal down is putting too much pressure on the brakes.
2. Regular driving
The second factor is your regular driving route. If we talk about driving courses, then highway driving on your brakes is much easier than going to the inner city.
It’s just because you brake less on the highway. While driving on the highway may not be possible, especially if you are constrained by your daily commute, doing so will help your brake discs last longer.
3. Average load
The third factor is the average load. Let us tell you that the more bags your bike carries regularly, the worse it is for the brakes.
Heavier loads mean that motorcycle brakes need to generate more friction, which means they have to work harder and wear out faster. If you often carry a lot of things that you don’t need, you might want to take them out of the trunk to make the brakes work better.
4. Frequency of driving
The fourth factor is the frequency of driving. Everyone loves driving, but the more you go, the less likely your brake discs will last as long as they should. If you regularly commute short distances with heavy braking, why not walk, cycle, or take public transportation?
Saving your bike for trips you can’t cover will prevent your brakes from breaking unnecessarily, helping them last longer.
When you inadvertently reduce some pressure on your brakes, you will notice a difference in your lifetime. Making just one of these changes should help improve the lifespan of your brake discs.
When Should We Replace Our Brake Discs And Pads?
However, it doesn’t matter what you do. Your brake discs and pads may require replacement.
And luckily, we’ve also listed several warning signs to help you comprehend when this maintenance is needed. Find out its faults before replacing a motorcycle disc.
Before taking the beats apart, the first task is to find the defect, if there is one. For example, many bike rollers show brake disc problems during fitness tests, so we know and understand that we can replace them.
The same includes the feeling of the deformed brake lever pushing back almost entirely against your braking fingers as the disc curvature pushes the pads back.
Because during this process, it completes one cycle and then identifies the issue.
Find the Problem and Replace Brake Discs:
1. Find and Identify the problem:
Once you have found the problem, it’s time to identify it. If the disc deforms less than 1 mm, it will make a big difference, so we put a dial gauge on the disc and spin the wheel. Y
ou should replace the disc if it pushes the pin and gives a speed reading. Although you should never change only one, always be sure to change both.
2. Replace the pads
When replacing brake discs, it is always essential to replace the pads as well, so both items wear correctly and are at their optimum.
For example, some bikes, such as Suzuki, have R clips holding the pads in place, so be sure to remove the pin while the brake is still loose on the machine.
Then take the calliper bolts out and rest them with a bungee cord, but the best way is to stick them to the handlebar or the mirror itself.
3. Take out the pad
Now let’s solve their problems and take out the pad. If the callipers are hanging completely free, flip the pads over.
Using the same pads and discs is always best, but that should be fine. Depending on the machine you slot them in, it will vary from calliper to calliper.
4. Push the new pads
Now push the new pads out the same way the other pads came out. They should click nicely.
You do, however, make sure they are entirely secure, and if it is needed, push them a little further to make it easier to fit them onto the new disc, which may feel a bit rough.
Go in gently with a flathead screwdriver, taking care not to damage the pad.
5. Undo the pinch-bolts
Now the callipers are out, and you have placed the pads. So gently undo the pinch bolts under the forks before removing the axle.
In the meantime, if you’re using a small fork stand, you’ll understand that you may need to loosen the mudguard if need be; you only need two or four fork legs to work with enough space, so that needs to be done.
Once you have done this, take the wheel off the bike and put it on the old tire. By doing this, you are protecting the rim and disc.
5. Deattach old disc from rim
Once you loosen the bolt, the disc should come out friendly and accessible. Now that its old disc is detached from the rim, it’s time to give its mating surface some TLC; carefully clean where the disc sits.
And if it’s become useless, be sure to take it to a skimming company, but at that point, make sure they don’t remove the metal. Sort the bolts and threads once you have completed the tasks mentioned above.
6. Clean Disc bolts
Most new discs won’t come with new disc bolts, so you have two options: buy a new set or use them after you’ve cleaned the original bolts. This will get the bolt clean again to look like new, and the old thread lock will go a long way toward picking up whatever’s left.
After all, it is worth cleaning the threads as well. A faucet works well, and you’ll see roughly an M8 x 1.25 in this case, but always use a size checker to be sure. For this process, take the tap, stick it in the driver, and then clean those threads properly.
7. Align New Disc
When done, line up your new disc. Once the bolts and threads look like new again, take your new disc out of the box and align it properly.
In this, you make sure that you have affixed some thread lock to the threads before reinstalling the new bolt on your shiny new disc. And thread it as far down the rope as you can because you don’t want the bolts jumping between you.
Then, insert each bolt loosely into the wheel and gently lift them. It’s best to go around it in a star shape from corner to corner while tightening it and checking the manual for the correct torque setting.
Once all the bolts are secured, clean the wheel with some blue roll and brake cleaner. Remove any excess bits or Loctite that may have remained in small quantities.
8. Flip the wheel over and make it fit
That’s what you’ve done aside; it’s time to flip the wheel over and make it fit perfectly. Ensure the procedures are consistent and focused, especially when removing the disc bolt.
It’s time to put it back on the bike, so line it up between the forks and put the axle back on. Then bolt on the calipers. Now that the wheels are in the right place, you should make sure that the calipers are properly fastened and check your manual again for the right torque settings.
9. Pump the front brake lever
With the wheel back in and the callipers bolted on properly, you give the front wheel a spin and pump the front brake lever. With new pads and discs on your bike, you must keep them running smoothly.
At first, 30 kilometers or so can feel a bit fuzzy as they wear well. A fast bike is excellent, but if your brakes are bent, you’ll have difficulty filling your tanks.
That’s why getting the best brake discs is always essential, even though OEM discs seem great for people these days.
Conclusion
Only do this at home if you are 100% sure what you are doing because a properly fitted brake disc is essential for your ride safety.
And if you feel you need more confidence and competence to carry out this feature’s advice, don’t attempt to do it at all.
In this case, you should consult an expert or take your bike to an accredited garage to have it professionally done. It is better to be protected than to be sad in this matter.